
Super Cubes in MicroStrategy 2019


Super Cubes in MicroStrategy 2019


Beginning in MicroStrategy 11.0 and 2019, users will notice objects referred to as "Super Cubes".  Super Cubes are simply a renaming of what was previously referred to as MTDI (Multi Table Data Import) Cubes.
Note that only the naming convention has changed, as the functionality remains the same. This name change is visible in MicroStrategy Workstation and MicroStrategy Web.


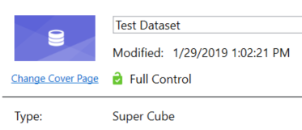
In MicroStrategy Workstation, right click on any cube created via Data Import and select Properties. The object Type is listed as Super Cube:
User-added image


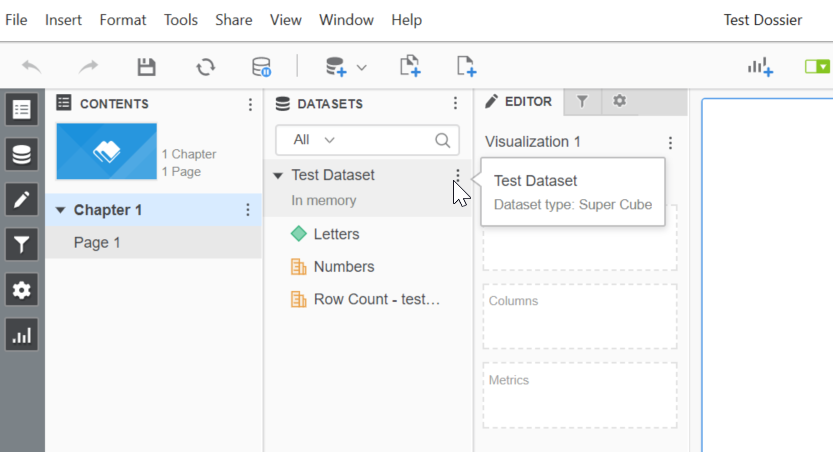
This can also be seen when editing or authoring a dossier. In your Datasets panel, hover over the name of your dataset. The tooltip will show the dataset type listed as a Super Cube.
User-added image

Comments

Popular posts from this blog

Microstrategy "Error type: Odbc error. Odbc operation attempted

 "Error type: Odbc error. Odbc operation attempted: SQLExecDirect. [HYT00:0: on SQLHANDLE] [MicroStrategy][ODBC Oracle Wire Protocol driver]Timeout expired" is shown when executing reports from Web When users are trying to execute some reports in MicroStrategy web in particular, they may receive the Error “SQL Generation Complete Index out of range” and “Timeout expired” error as shown below: Possible Causes: One possible cause is that the MicroStrategy Intelligence Server using a cached database connection that was already dropped by the RDBMS. To resolve this: Admin should delete the database connection caches and create a new DSNs in case they are sharing DSNs to connect to different databases. In addition, change the settings for the ‘Connection lifetime’ and the ‘Connection idle time out’.  Follow the steps below to perform the mentioned changes and verify the report after each step and some of the settings require i-server r...

MicroStrategy URL API Parameters

MicroStrategy URL Structure The following table summarizes the root URL structure used for every request to MicroStrategy Web. Environment Main Application URL Administration URL J2EE http://webserver/MicroStrategy/servlet/mstrWeb http://webserver/MicroStrategy/servlet/mstrWebAdmin .NET http://webserver/MicroStrategy/asp/Main.aspx http://webserver/MicroStrategy/asp/Admin.aspx Every request sent to MicroStrategy Web calls a central controller. Parameters are appended to  Main.aspx  or  mstrWeb  (in a .NET and J2EE environment, respectively) to indicate to the controller how the request should be internally forwarded and handled. The following examples show a URL for accessing a MicroStrategy folder when the user does not have an existing session. The URL contains not only the parameters needed to connect to MicroStrategy Web, but also the parameters needed to log on and create a session. J2EE environment: <a href="http:...

"Table structure cannot read or update" in the warehouse catalog error while updating a table structure in Microstrategy

"Table structure cannot read or update"  in the warehouse catalog error while updating a table structure while using Warehouse Catalog in MicroStrategy Developer  This issue could be due to the incorrect prefix.  To fix the issue. 1. Open the Warehouse Catalog. 2. Select the table and assign the correct Prefix update the structure. 3. Save and close the warehouse catalog.

Administration standards to optimize network data transfer speeds

Optimization standards to help developers work with the System Administrator to optimize network data transfer speeds: Place all server components in the same segment to minimize latency between the Intelligence Server, Web server, data warehouse server, and metadata server Expand bandwidth and minimize latency between servers and clients to ensure that bottlenecks do not occur when data is requested over your network Use HTTP compression between the Web servers and Web clients to achieve maximum throughput between these components Configure a Web proxy server to handle caching and reduce the load on the Web server

Logical Views to specify an outer join between two attribute lookup tables when only attributes are on a report

Logical Views to specify an outer join between two attribute lookup tables when only attributes are on a report Apart from using the VLDB properties to create the left outer join,  article describes how to use the Logical View to specify an outer join between two attribute lookup tables when only attributes are on a report. This method exists as attribute only outer joins will not be generated on their own by the MicroStrategy SQL engine. This is because they are only necessary with r agged/unbalanced hierarchies which are not supported as null attribute IDs are not supported (parent elements with no child elements or child elements with no parents).  Brief instructions are provided using the example below. Consider, two attributes: Parent01 and Child01 have a parent-child relationship. Their Lookup tables are defined, as follows Parent01 Child01 Note that although there are 4 ID values for the attribute Parent01, there is no defined relationship ...

Customers Who Live in the Same City as Call Centers

Customers Who Live in the Same City as Call Centers Your new utility company has call centers located throughout the country, and your recent surveys indicate that customers who live in the same city as a call center are particularly satisfied with service due to extremely rapid repairs during power outages. To begin your new advertising campaign, you want to generate a list of Call Centers that coincide with Customer Cities. The following steps create an attribute-to-attribute qualification filter that generates the list of desired cities. To Create an Attribute-To-Attribute Qualification that Compares the Call Center and Customer City Attributes In MicroStrategy Web, log in to a project. Open any folder page (for example, click Shared Folders on the home page). Click the  Create Filter  icon  . From the Object browser on the left, select the  Customer City  attribute from the Customers hierarchy and drag it to the filter pane on the right. Change  Qualify...

HyperIntelligence Training Videos

HyperIntelligence  Training Videos           Design and build hyper cards Optimizing Datasets for HyperIntelligence Using the HyperIntelligence for Office Outlook Add-In Building HyperIntelligence Cards Using HyperIntelligence for Mobile on Android Deploying HyperIntelligence for Outlook Insights On-The-Go: HyperIntelligence for Mobile Building HyperIntelligence Profile Cards Designing Custom HyperIntelligence Cards Using the Calendar with HyperIntelligence for Mobile

Prompt-in-prompt (Nested prompt) feature in a FreeForm SQL Report

Prompt-in-prompt (Nested prompt) feature in a FreeForm SQL Report In some business scenarios, it is required to implement prompt-in-prompt (nested prompt) feature to use the answer of one prompt to qualify on the elements of another prompt in Freefrom SQL reports in MicroStrategy Developer 9.4.x-10.x. The following procedure describes how to achieve prompt-in-prompt in a Freeform SQL report in MicroStrategy Tutorial project: Create a new filter, select Add an Attribute qualification and choose the highest level attribute Country. Make sure to Qualify On: Elements. Click Prompt as the image shown below. Accept all the default values without any changes in the popped up window after clicking on "Prompt" as shown below. Save the filter as "Country Filter". Click "Prompt", choose "Use a filter to reduce the number of elements" option and select Country Filter created in last step, as shown below. Save the filter as "Region Filter...

Create a transaction services photo uploader

Create a transaction services photo uploader   1.  Create a new table "photo_upload" in Tutorial warehouse database (the default location: C:\Program Files\MicroStrategy\Tutorial Reporting\TUTORIAL_DATA_7200.mdb), as shown below:    2. The 'photo_upload' table has to be pre-populated with *exactly* 10 rows of data, the values for the 'ID' column should be 1-10 and the values for the 'uploaded' column should all be 0 3.  In MicroStrategy Desktop, create a freeform report "R1" based on the new table "photo_upload" in Tutorial data created at step 1, as shown below:   SELECT Location, Description, ID, uploaded, numbers FROM PHOTO_UPLOAD 4.  Create another table for transaction insert SQL. Make sure to create an 'autonumber' type ID as primary key for this table, or auto_increment ID for different DBs.                     5. Create...