MicroStrategy Mobile Configuration for the Connectivity Settings

MicroStrategy Mobile Configuration for the Connectivity Settings

Using the Mobile Administrators page, designers can create and distribute configuration links. Users can click the links to configure their devices according to settings determined by the Mobile Administrator. The Mobile Administrator can distribute configuration links by emailing them or posting them to a secure internal website. 
MicroStrategy Mobile configuration settings can be modified by: 
• Manual configuration on the mobile device 
• Configuration using the Mobile Administrator page

The Mobile Configuration page contains the following tabs:
• The Settings tab contains Mobile app behavior options, governing limits, and security settings. For example, you can configure how much memory the app can consume, the network timeout for trying to connect to the project, and access to the Settings screen in the app, among other options.
• The Connectivity Settings tab enables authentication information to be set for Mobile servers and projects.
• The Home Screen tab provides choices for what users see upon opening MicroStrategy Mobile for iPhone, iPad, or Android.

Access your MicroStrategy Cloud environment
1.     On the MicroStrategy Cloud landing page, under MicroStrategy Mobile Administration, click Configure Admin.

2.     If prompted, in the Windows Security window, in the User name and Password boxes, type (or copy and paste) the login credentials listed in the Welcome to MicroStrategy on AWS email.
Create the configuration link
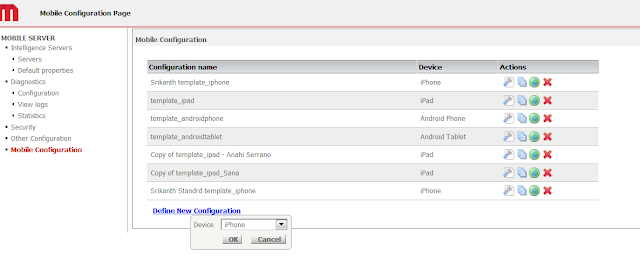
3.     On the MicroStrategy Mobile Administrator page, click Mobile Configuration, on the left.The MicroStrategy Mobile Administrator page displays.


4.     On the Mobile Configuration page, locate the configuration name corresponding to your device and select the second icon to Duplicate the configuration link.


5.     Under the new copy of the template, click the first icon to Modify the configuration.
6.     In the Configuration name box at the top, type your user name provided by the instructor earlier in the course.
7.     Click the Connectivity Settings tab.
8.     Under Default Project Authentication, below your project name, deselect the Use default authentication check box. In the Authentication mode drop-down list, select Standard, and in Login id and Password boxes, type the user id and password provided by your instructor.
9.     In the Configuration name box on the top, type UserX My Mobile Configuration where UserX is the User ID provided by your instructor.
10. At the bottom of the page, click Save.
11. Click the Generate URL link. Search for the correct configuration by locating your device in the Device column.

12. On the Generate Configuration URL window, the Server Name field should be automatically populated.
If this name is not automatically filled in:
      •Type the IP address or a domain name of the machine listed in the URL of the MicroStrategy Cloud landing page. Example: env-23638.customer.cloud.microstrategy.com.
•Select the Include port check box, and in the box type 443.
•In the Request type drop-down list, select HTTPS.
•In the Authentication Mode drop-down list, select Anonymous.
13. Click Generate URL.
*Due to a requirement of the Android operating system, a short URL must be created when sending the configuration URL to users. To generate a short URL for Android, select Use short URL.The URL is displayed in the box below the Generate URL button.
14. Copy and paste the URL into an email and send it to an email account accessible from your mobile device.
Open the Sales Performance app
15. Open the email with the generated URL on your mobile device, then click the link or paste the URL in the browser of your device to configure the MicroStrategy app.
If the link is not active, copy and paste it into the web browser on your device. Your environment should open in the installed MicroStrategy Mobile app.

16. In the MicroStrategy Mobile app, depending on your device, you can navigate to the Shared Reports folder in a variety of ways:When the Mobile user taps the URL on the mobile device, the user may be prompted to provide a user name and password to log in to MicroStrategy Mobile Server using this authentication mode. For this class, this is the user ID and password provided by your instructor.
•Tap Browse the project home screen
•Click the folder icon on the home screen
The Shared Reports folder contents will be visible.

17. Under the Users\UserX folder, tap Sales Performance App.
You will notice that the markers on the map appear differently on your mobile device. a Open any one of the documents to view the app. b Navigate between the documents using the buttons. c Interact with the visualizations on each page.

Comments

  1. Microstrategy Mobile Configuration For The Connectivity Settings >>>>> Download Now

    >>>>> Download Full

    Microstrategy Mobile Configuration For The Connectivity Settings >>>>> Download LINK

    >>>>> Download Now

    Microstrategy Mobile Configuration For The Connectivity Settings >>>>> Download Full

    >>>>> Download LINK UT

    ReplyDelete

Post a Comment

Popular posts from this blog

Case functions Microstrategy

Ca se functions Microstrategy Case functions return specified data in a SQL query based on the evaluation of user-defined conditions. In general, a user specifies a list of conditions and corresponding return values. Case This function evaluates multiple expressions until a condition is determined to be true, then returns a corresponding value. If all conditions are false, a default value is returned.  Case  can be used for categorizing data based on multiple conditions. This is a single-value function. Syntax Case ( Condition1 ,  ReturnValue1 ,  Condition2 , ReturnValue2 ,...,  DefaultValue ) Example Case(([Total Revenue] < 300000), 0, ([Total Revenue] < 600000), 1, 2) sum(Case (Day@DESC in (ā€œSatā€,ā€Sunā€), Sales, 0) {~+} Sum(Case(Category@DESC In("Books","Electronics"),Revenue,0)){~+} CaseV (case vector) CaseV  evaluates a single metric and returns different values according to the results. It can be used to perfo...

MicroStrategy URL API Parameters

MicroStrategy URL Structure The following table summarizes the root URL structure used for every request to MicroStrategy Web. Environment Main Application URL Administration URL J2EE http://webserver/MicroStrategy/servlet/mstrWeb http://webserver/MicroStrategy/servlet/mstrWebAdmin .NET http://webserver/MicroStrategy/asp/Main.aspx http://webserver/MicroStrategy/asp/Admin.aspx Every request sent to MicroStrategy Web calls a central controller. Parameters are appended to  Main.aspx  or  mstrWeb  (in a .NET and J2EE environment, respectively) to indicate to the controller how the request should be internally forwarded and handled. The following examples show a URL for accessing a MicroStrategy folder when the user does not have an existing session. The URL contains not only the parameters needed to connect to MicroStrategy Web, but also the parameters needed to log on and create a session. J2EE environment: <a href="http:...

User request is completed. (Ran out of memory)

Unable to Run/Edit particular MicroStrategy reports ue to the following error: User request is completed. (Ran out of memory) User request is completed. (Ran out of memory) The above issue appeared in MSTR Web Universal version 10.5 We tried the below options without any luck: 1. i-server restart 2. Web server restart 3. clear document cache/dataset cache 4. Web server cache clear as below: The correct option is to increase the contract memory settings: Using the Memory Contract Manager The  MCM settings are in the Intelligence Server Configuration Editor, in the  Governing Rules: Default: Memory Settings  category. The  Enable single memory allocation governing  option lets you specify how much memory can be reserved for a single Intelligence Server operation at a time. When this option is enabled, each memory request is compared to the  Maximum single allocation size (MBytes)  setting. If the request ...

Microstrategy Dashboard performance improvements steps

Microstrategy  Dashboard performance improvements steps: Many times, causes of poor performance can be simplified to specific components. To troubleshoot performance issues, users must identify these components, then make the appropriate modifications to the environment and/or to the MicroStrategy dashboard to reduce bottlenecks. Dashboard execution stages can be represented below: MicroStrategy Intelligence Server When an end user makes a  Document Execution Request  through any client (a web browser via MicroStrategy Web, the MicroStrategy Desktop/Developer client, the MicroStrategy Mobile app, or the MicroStrategy Office client), the request is sent to the MicroStrategy Intelligence Server, which processes the request and prepares the response. The MicroStrategy Intelligence Server will execute all children datasets on the dashboard by either generating SQL and running this against the data warehouse, or by fetching data from a cache. The Inte...

Multi-Select Drop Down Selector with Apply Button

Multi-Select Drop Down Selector with  OK Button  When creating a Report Services Document, you may want to create a drop down selector to save space, but also would like the drop down to be a multi-selector with OK/Apply button. Below are instructions to achieve this in a Report Services Document.  Steps to Create: 1. Right click on your drop down selector and choose Properties and Formatting 2. Navigate to the Layout Tab 3. In the layout tab, click "Allow multiple selections". It will  not  indicate that the check box is enabled, but this step is mandatory.  3. Next, navigate to the Theme tab. Choose the  L ight Theme  from the drop down menu and click the Apply button. 4) Next, change the Theme back to  None  and click Apply. 4. When you return to the Layout tab, you will see the checkbox for  Allow multiple selections  is now checked.  

Search for Freeform SQL Reports in MicroStrategy Developer

Search for Freeform SQL Reports in MicroStrategy Developer Steps below will guide to find out all the Freeform SQL Reports in a project in MicroStrategy Developer: Log in to the particular project from Developer and click the search button or use Control +F Go to Tools > Options > Enable "Show ' Contains ' and ' Contained by ' tabs" as shown below: 3.  Click OK > Go to "Contains" tab and select Logical Table for "Contains any object of this type" as shown below:  4.  Then go to Object Types tab and select Report as the object as shown below: 5. Click Find Now and all Freeform SQL Reports will be displayed.

Control the display of null and zero metric values

Show   Control the display of null and zero metric values in a grid report You can determine how to display or hide rows and columns in a grid report that consist only of null or zero metric values. You can have MicroStrategy hide the rows and columns in the following ways: Hide rows and columns that consist only of null metric values Hide rows and columns that consist only of zero metric values Hide rows and columns that consist only of null or zero metric values (default) Once you have defined how MicroStrategy hides null and zero metric values in the grid, you can quickly show or hide the grid using the Hide Nulls/Zeros option in the Data menu, as described below, or by clicking the  Hide Nulls/Zeros  icon  in the Data toolbar. To determine how null and zero metric values are displayed or hidden in a grid report Open the report in Edit mode. From the  Tools  menu, select  Report Options . The Report Options...

Create a transaction services photo uploader

Create a transaction services photo uploader   1.  Create a new table "photo_upload" in Tutorial warehouse database (the default location: C:\Program Files\MicroStrategy\Tutorial Reporting\TUTORIAL_DATA_7200.mdb), as shown below:    2. The 'photo_upload' table has to be pre-populated with *exactly* 10 rows of data, the values for the 'ID' column should be 1-10 and the values for the 'uploaded' column should all be 0 3.  In MicroStrategy Desktop, create a freeform report "R1" based on the new table "photo_upload" in Tutorial data created at step 1, as shown below:   SELECT Location, Description, ID, uploaded, numbers FROM PHOTO_UPLOAD 4.  Create another table for transaction insert SQL. Make sure to create an 'autonumber' type ID as primary key for this table, or auto_increment ID for different DBs.                     5. Create...

Microstrategy Custom number formatting symbols

Custom number formatting symbols If none of the built-in number formats meet your needs, you can create your own custom format in the Number tab of the Format Cells dialog box. Select  Custom  as the Category and create the format using the number format symbols listed in the table below. Each custom format can have up to four optional sections, one each for: Positive numbers Negative numbers Zeros Text Each section is optional. Separate the sections by semicolons, as shown in the example below: #,###;(#,###);0;"Error: Entry must be numeric" For more examples, see  Custom number formatting examples . To jump to a section of the formatting symbol table, click one of the following: Numeric symbols Character/text symbols Date and time symbols Text color symbols Currency symbols Conditional symbols Numeric symbols For details on how numeric symbols apply to the Big Decimal data type, refer to the  Project Design Guide . ...

Retrieve a list of user groups and the associated users in MicroStrategy Developer 9.x / 10.x

Retrieve a list of user groups and the associated users in MicroStrategy Developer Follow the steps below to create a list of all groups and the users in each group: In MicroStrategy Developer 9.x, select 'Project Documentation' from the Tools menu to start the wizard. Select any project that is in the project source that contains the users and groups and click Next. Select only Configuration Objects for documentation. Uncheck the 'Basic Properties' object category from the next screen, as shown below: Then select only 'User Group' under the Configuration Objects section and only 'Groups' and 'Members' under the Definition section, as shown below: Go through the rest of the wizard, and open the resulting documentation. After navigating down to the User Groups, the documentation should look similar to the following image: This page shows every group, any child groups, and all members of each group.